Sunday, August 8, 2010

Lots of cutting...

I am still debating about the binding of my quilt, so I've put it on temporary hold until I can get to the quilt/fabric store (the awesome Asheville Cotton Co).

Today I worked on two projects: my next quilt and my diaper bag. I think all in all (considering the goofing off I did this morning and later snag...) it was a productive day.

I cut the "coins" for my stacked coins quilt. I now have 112 "coins" - wow. Next step - get them arranged in 5 rows of 22.


I wasn't feeling up to the coin matching, so I moved on to my diaper bag. The pattern I picked is the "Here We Go Bag" from Anna Maria Horner's Handmade Beginnings.


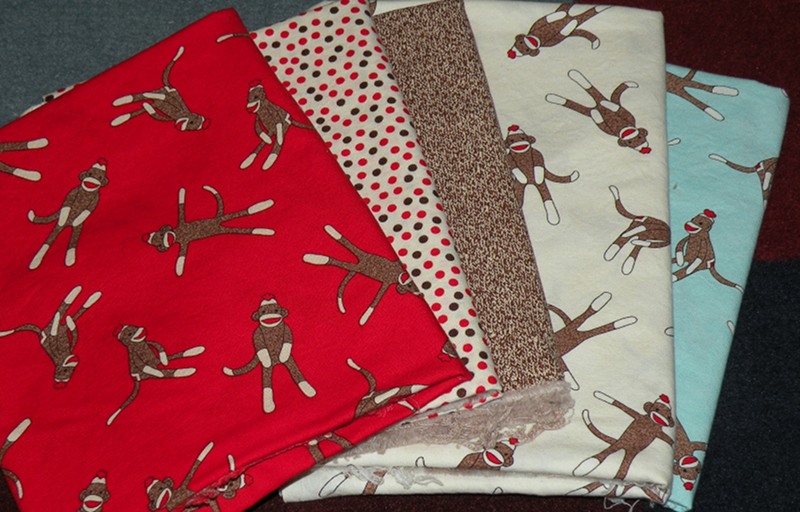
I am going to use the awesome sock monkey fabric that I got at a baby shower in June. Here is what I am thinking for the bag:
For the main outside part, the red sock monkeys.
For the handles and top edge, the polka dots.
For the side panel, the "sock" fabric.
For the liner/inside pockets, the blue and off-white sock monkeys.
How do you think that will look?


The patterns in the book are overlapped so you have to trace them onto something else to use them. There were also some pattern pieces to make with simple measurements. I didn't have anything at home to do that with...


I did a little internet searching and found some pattern tracing paper options. So I drove out to our local Hancock Fabric store, but they did not have it. Or anything like it. The only tracing paper they had was 8 1/2 x 11. Boo.

I went next door to the A.C. Moore to see if they had something and happened upon a large pad of tracing paper in the art supplies. Its a little more than I wanted to spend, but it is 50 sheets of 19 x 24 paper. Its sturdy enough to re-use, so I think it will be a good investment. I could have ordered the stuff I found online, but I really need to get this show on the road before I go back to school this week. So, I got the pattern pieces all cut out and, man alive, there are a lot of them! I knew that this bag would be a harder project than I've done before, and I hope I haven't gotten in over my head!

Saturday, August 7, 2010

So close!!


Yesterday I finished quilting! I really was nearly finished the day of my last post - all except for the last little tiny section. I love how it turned out. I still know that my quilting needs practice, but its really not as bad as I thought it would be. All that's left is the binding and I need to pick a color for it. I would love some suggestions from you. I have been contemplating the pink from the birds - but would that be weird since only the bird fabric has pink in it? What about yellow? Or blue? See, I need help. Please let me know what you think.

Wednesday, August 4, 2010

Free-motion quilting


Well, I did it. I am free-motion quilting. I am half-way through my quilt and it is certainly not gorgeous, but its not horrific either. I do have some definite opinions on the process, though. Here is what I've figured out so far.
Some of the pictures are hard to see, but if you click on them, it will show it to you a little bigger...

1. It was recommended to use a setting on your machine always that leaves the needle in the "down" position when you take your foot off the pedal. Holy crap I wish my machine had that option! Because you are working with such a large object in such a small space, if the needle is not down when you stop, it is highly likely that the quilt will slip and you will restart slightly off from where you stopped, making a little notch in your quilting line. I tried to hold onto the quilt each time and manually place my needle down before I moved my hands, but I wasn't always able to do that, or sometimes I just forgot.


2. I don't think I could use this quilting technique on anything larger than this quilt. It is very difficult, in the middle especially, to move the quilt around smoothly because of all the extra that is all around. I have the right side rolled up like the tutorial suggested, but it is still very awkward. Making nicely curved lines and keeping the stitches even is all about how smoothly your hands move, but even if I had the fine motor skills of a god and years of practice, it would be hard to do that with that much extra quilt to the sides, top and/or bottom. Then again, lots of people do it, I reckon.
(Now that I added the picture, the rolled-up part doesn't look so big, but its awkward, trust me.)


3. Machine quilting is SO MUCH FASTER than hand quilting. That is a VERY big plus. The other quilts I've made and/or helped with have been hand-quilted, which is nice, but it takes for-eh-var. I can't imagine how much even faster this would be going if I'd decided to use a straight-line pattern with a walking foot. I think that is what Christine is going to do, so we can compare later.

4. I need more practice. I am glad I decided to go for it with this quilt, even though I was really nervous. Like I said previously, the quilt is not perfect, but not awful either. Chances are, as time passes, I won't even really be that bothered with the funky places. The quilt on my bed is so super wonky (yeah, we didn't measure anything.) and I don't even notice it.
side note: I looked for a picture that I am sure I took of that quilt and included in a blog post, but I couldn't find it. I really should add those neat labels to my posts for that kind of thing.

Here are some close-ups of the quilting. Its definitely not as smooth as I would like, but it will do.


I will update again when I finish the rest. Hopefully it will happen today!

Tuesday, August 3, 2010

Quilting

I'm going to start my machine quilting today. There I said it. Now I have to do it. I'm nervous, but I think it will subside once I get started. I hope...

Here is the quote from the tutorial that makes me nervous:

"The first quilt that I stitched like this is TERRIBLE. Really, it is."

I don't want my quilt to be terrible. Then again, if I never try, I'll never get any better. And in fairness, the next sentence on the tutorial says this:

"But we use it all the time and I love it. I just don't look too closely at it."

So I guess it can only be so bad. We'll see.

Pics to come. Maybe.

Sunday, August 1, 2010

Mei Tai Carrier

I finally finished the baby carrier! It seems a little small, but then again, I hope the baby is small - at least to start with!! I followed the pattern, so I guess its the right size. The pattern I used is the Mei Tai Baby Carrier from sewliberated. Meg had got such great patterns - I highly recommend them. They are stylish, yet classic, and (perfect for me) very easy to follow. I've also made a couple of the the Emmeline Aprons from her pattern collection as well. Here is Meredith's apron and Karen's apron.

This carrier was so simple to make! The outside fabric (brown) is a cotton corduroy and the inside (green) is a snuggly cotton flannel. The very top should have been a little more rounded, but I guess I got off on my cutting/sewing somewhere.


The outside has a pocket that is supposed to be for folding up the carrier for easy storage - I guess I need to practice that part - mine looks a little wonky.


Next up - quilt my Quilt-A-Long quilt and get started on a diaper bag! Yay!