Sunday, December 19, 2010

Quick Update

I don't have much time to type but I want to pop in and say "Hi! I'm still here!" and give you some promised Ruffin pics. I also have a couple of completed presents to share with you! First of all, these pouches (which have been delivered - stuffed with goodies, mostly chocolate!) were so easy and turned out perfectly that now I want to make myself an army of them. Right now. *ahem* What I mean to say is I really want to finish Christmas presents first...


I used a modified version of this tutorial. I wish I could get that adorable elephant fabric that she used, but alas, it was not to be. I will fill you in on my mods later when I make my army of them.

Also, I figured it was safe to post the present for my 2-year old niece because I'm pretty sure she doesn't read my blog. Thanks for this idea, Carmen!


Lastly I would like to shower you with a little Ruffin love. He is sporting some of the amazing things Carmen sent me! She told me she made "a little something" for Ruffin, but I was blown away with the awesomeness of what we received! Check out her post about it!


This is the sweetest little monkey lovey/blankie. It is so soft! Ruffin has a similar monkey lovey that has a rattle in his head, which he adores. This one does not have a rattle, so we have named it "Night-night Monkey" and its perfect for sleep snuggles. It keeps him happy until I get to him when he wakes up at night, which is great!


This is a fleece blanket with a crocheted edge and a cutie cute crocheted monkey in the corner. If you can't tell by now, we love monkeys. Love. Them. Ruffin has been snuggling with this one in the car.

Carmen also send a gorgeous changing pad (which I will not be showing in action), a monkey ornament for our Christmas tree, the sweetest card (which she made, of course!) and a quilted zipper pouch and headband for me! How awesome is she?!!? (You will have to check out her pics of those things for now, since its been yucky cloudy here and mine turned out poorly.) Thanks so much, Carmen!!

Monday, December 13, 2010

Stover Family Stockings


Yay! We have a snow day from school today so I finished our stockings for Ruffin's first Christmas. Now, we may not have anywhere to hang them since we are in the process of buying a house and may be moving over Christmas, but we'll at least have them!


They are reversible (I am so excited about that) but since the wind chill was ZERO today (for real) I didn't hang around to snap a photo of the inside view yet. I'll try to get better pictures soon. I designed this stocking and I have written my very first pattern/tutorial - coming soon to my blog! I am really REALLY excited about that! I need to finalize it and proofread. Carmen (who just sent me the most Ah-May-Zing package for Ruffin - my pics in the next post, stay tuned!) inspired me to do this with her first tutorial for her skinny daisy chain scarf.

Ruffin's stocking...


Daddy's stocking...


Mommy's stocking...


And, as promised, here is some cutie pie Ruffin love!

Look out, Daddy, I'm claiming your chair!


Sweet man!


And now back to the sewing room for me to finish my Christmas presents!

Tuesday, November 30, 2010

Aaaaaaahhh Diaper Bag!!

I am FINALLY done with my diaper bag. Only three months late. If you remember, I got a late start (Ruffin was nine days early and his mommy is easily distracted by other projects) and I had some issues with my first attempt. Take-two went much more smoothly. I used the "Modern Diaper Bag" pattern from 
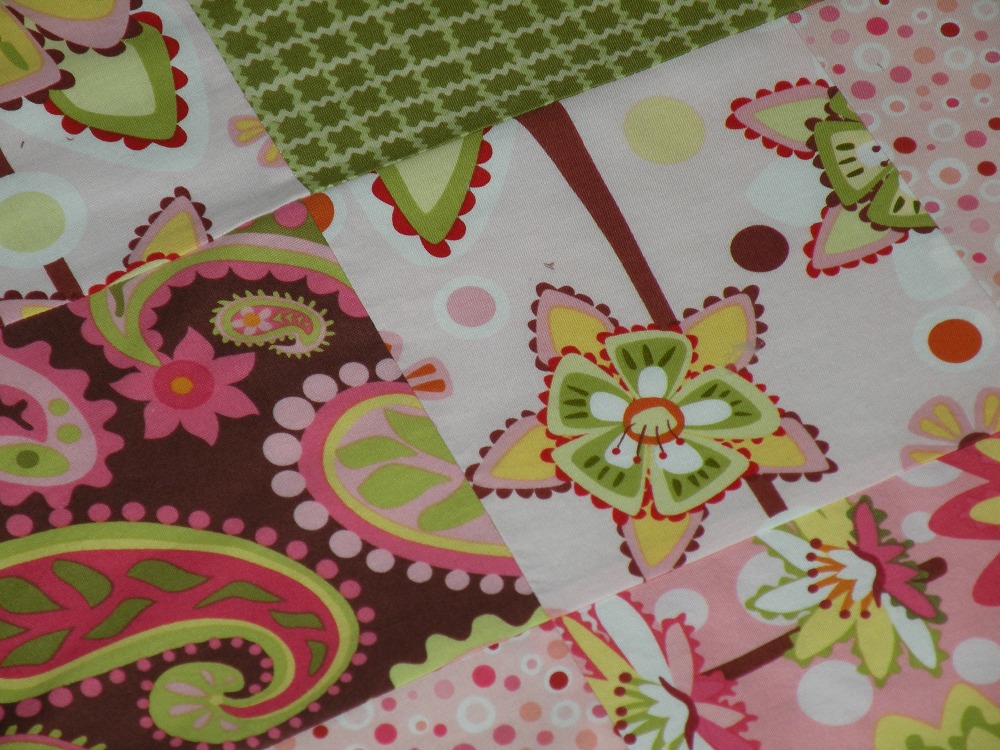
Amy Butler's Little Stitches for Little Ones. Its huge and I love it! I had to cut out a billion pieces for it. Well, okay, just 52, but that's a lot! The directions were pretty simple to follow, as I have found most Amy Butler patterns to be. I did hit a few snags (mostly my fault). One morning I started sewing before I had my coffee and ended up with this:


Oops!!


Now that's better! Starbucks' Gingerbread Biscotti is my absolute favorite coffee accessory. Yummy!!

I had trouble with the pleats on the inside pockets. I found those instructions a little confusing, but luckily I was not the only one (yes, its that big and isn't her fabric is gorgeous?). I ended up kind of pleating as I sewed there, and it worked out alright. Once I got to the instructions for the cell phone pocket, those were much more clear and I realized what she intended for the inside pockets. Oh well, mine worked. I actually ended up not using her instructions for the cell phone pocket and just made a small pocket on my own.

The pattern called for fusible fleece as interfacing. I have used fusible fleece before, but not on such large pieces and not on things that were handled so much. Next time, I will use the more permanent fusing technique (with a damp pressing cloth) instead of the light-weight fusing because my fleece came un-fused in several places, adding wrinkles to my liner. I worked most of them out, and since its the liner and not the outside, I am going to ignore the rest. ;)

The last part was the hardest - finishing the handles. In other bags I've made, I sewed the outside and liner together completely inside out (right sides together), leaving a hole for turning in the liner construction. This pattern did not use that technique - it had me turn through the inside handle opening and then fold the edges under and topstitch. That is always harder for me to get even and, with all the interfacing, was even more difficult on this bag. The inside corners were especially frustrating. I'd say that I would use the turn-through-the-liner technique next time, but I figure my self-taught minimal sewing experience is no match for Amy-freaking-Butler, so she probably had good reasons for using that method. Probably all the interfacing, as well as all of the pockets on the inside, would make it hard to turn through the lining. If I hadn't spent three months trying to finish a diaper bag I might've had a little more patience finishing this one. :)

And here is it - my e-nor-mous diaper bag. After re-reading what I just wrote it seems like I had a lot of trouble, but it really was not too difficult! I love this bag! I will try to get some better pictures, it been raining here the last two days.


Next on the list are Christmas presents (yes, I made a diaper bag for myself first) so I won't be posting those projects until they are handed out. I have already started some, so don't panic. I know Christmas is sneaking up frighteningly fast! I will, however, keep you entertained with pictures of my sweet little Ruffin until I can share the projects with you! Here he is helping me with the laundry. :)

Sunday, November 28, 2010

New address

Hi! If you've tried to visit my blog in the last week or so, you've been dissapointed. Sorry! I moved to a new address - welcome to www.nancymoo.com! I love my blog name - "Voulez-vous crochet avec moi?" even after finding out that Debbie Stoller used it in her book "Stitch-n-bitch Crochet: the Happy Hooker." BUT its a hell of a name to give to people as an url because most people can't spell in French. So please change your bookmark to the new addy, but don't worry if you don't, blogger will redirect you! And for those of you with ambitions of your own url, blogger will send your site to your own domain name and you don't have to pay a hosting fee - score! Here's the link to the how-to.

Here's some Ruffin love to tide you over until I finish my Diaper Bag post - its nearly done - YAY!! I took the pic with my phone, which is why it looks fuzzy. I wish my phone had a better camera on it. Who would've ever thought that sentence could exist a few years ago??

Wednesday, November 10, 2010

Quilt Show!

So I took most of these pictures three weeks ago, but didn't get to finish this post then because I hadn't finished my new quilt yet! I got to spend some time with my family, which was so wonderful, but I didn't get any sewing done. Not to mention the whole new baby thing... So the little present that I was supposed to "whip up" took a month instead of a week! Oh well. So these Ruffin pictures are from three weeks ago - he is even bigger and cuter now. :)

A wonderful friend, who knew me when I was this age, made this sweet quilt.


This quilt was made by Michelle at Dreams of Sewing Machines. Check out her etsy shop and blog!


That's right. Its a fire flower. Its super geeky awesomeness!! Did you like being Mario or Luigi? I always wanted to be Luigi.


Lastly, this is the little quilt I made for my friend, Dana, who gave me all the cute clothes from her boys! Her new little girl is 2 weeks younger than my little man.


It has a snuggly minky back and since it is solid, I decided to use some scraps from the front to spice up the binding. I was talking to Michelle about my idea and she says "Oh, a reversible binding! You know how to do that?" and me, thinking I'd been really original, say, "Uh... no, I was just going to make it up." So, thankfully she told me just what to do, and the quilt looks good because of it! Thanks, Michelle!


And, just because I can, here is a gratuitous picture of my sweet little man from today (in a shirt from Dana's boys!).

Tuesday, November 9, 2010

Cherished memories

If you've read my blogger profile, you will know that I began my crafting life as a little girl when I learned to crochet from my Grannie. I don't remember how old I was, but I still have the crochet hook she gave me from her collection. The times I spent with her are some of my most cherished memories.

I grew up on the same farm where she and my Grandaddy lived and raised my dad and his siblings. I could walk over to see her any time I wanted and I spent the afternoons, summers and Sundays of my childhood at her house. She was retired by then and we spent the summer mornings in the garden and in the afternoons she would sit and crochet. She would make things for the church bazaars and for our Christmas presents - I don't know how many pair of crocheted slippers I went through as a child! When I became curious she handed me a hook and a skein of yarn. She was so patient with me and would show me the same things over and over when I forgot a stitch.

As I got older, I didn't crochet much until I got to college. When I did get back into it, I picked it up again with a passion. I started simple, with the things she'd taught me - basic stitches, granny squares and hanging dish towels (these are still some of the easiest, most useful gifts to make!). I gradually taught myself more things with books and the (new, amazing) internet. A few years later when I finally had the guts and patience to undertake an afghan, I brought the finished product over to show her and she told me how proud she was of me. At this point, her arthritis made her unable to crochet anymore, and she asked me to make her some hanging dish towels (that she taught me how to make!). I was so flattered! Every time I went over to her house after that, she had my towels hanging in the kitchen where the ones she used to make would hang.

Grannie passed on October 27 at age 91. She was a strong woman who always spoke her mind and loved her family fiercely and unconditionally. She had an enormous influence on my life, not just my crafting one, and I will miss her always.

Monday, October 18, 2010

Diaper Bag Woes

I wrote a post a (long) while ago about making this diaper bag from Anna Maria Horner's Handmade Beginnings. I also posted in my project list that I hit a snag and was trying to figure it out. This was all before I had sweet Ruffin, so I never finished the bag. Since bringing him home, I haven't had much sewing time. In the time I have fit in, (when he allows me to hang out in the sewing room with him) I have become even more frustrated. I am pretty sure I am to the point of putting this bag aside and finishing it later, or maybe even never, which is a shame since I was so excited about the cute sock monkey fabrics. I took some pictures of the screwiness, but they're not even worth it.

Its not all woes in the sewing room, though. I have bought some new fabric (yay!!) and I have plans for a new diaper bag (Amy Butler pattern this time), an Emmeline apron for myself, and several baby quilts - so many pregnant friends!! Check out the sweet new fabrics!!


Lastly, I have a super cool friend who gave me TONS of baby clothes. She was also pregnant the same time as me and had a sweet little baby girl two weeks after Ruffin was born. Our due dates were only 3 days apart (hers was before mine, actually) but my little guy came early and her little gal came late!! Anyways, to thank her I am making her a little surprise - here is a sneak peek...


Yay to be back in the sewing room!! So far Ruffin has only spent his napping time with me in there.


Now I have to convince him how super duper fun it is in there when he's awake (which is most of the day now)!! Good thing he's super cute! Check out his new shoes! :D

Saturday, October 9, 2010

Lazy Post

I don't have the time (or energy) for a real post, so enjoy some super cuteness.... :)


Tuesday, September 21, 2010

Pictures!

Sorry I'm so slow. Here are some pictures!

Yay quilt!

Yay Ruffin!
(2 weeks old in this pic)


Eventually I'll get one combined of Ruffin *on* the quilt... :)

Wednesday, September 8, 2010

So much excitement!

Hi all - Sorry I've been away. Here's a quick run-down of what happened in the last month:

  • Started school
  • Prepped for long-term sub
  • Finished Quilt-a-long
  • Had a baby!!

Yep! Ruffin was born on September 3 at 11:07. He was 7lb 4oz and 19 1/2 inches long. He's amazing and I promise I'll post photos soon!!


:D

Sunday, August 8, 2010

Lots of cutting...

I am still debating about the binding of my quilt, so I've put it on temporary hold until I can get to the quilt/fabric store (the awesome Asheville Cotton Co).

Today I worked on two projects: my next quilt and my diaper bag. I think all in all (considering the goofing off I did this morning and later snag...) it was a productive day.

I cut the "coins" for my stacked coins quilt. I now have 112 "coins" - wow. Next step - get them arranged in 5 rows of 22.


I wasn't feeling up to the coin matching, so I moved on to my diaper bag. The pattern I picked is the "Here We Go Bag" from Anna Maria Horner's Handmade Beginnings.


I am going to use the awesome sock monkey fabric that I got at a baby shower in June. Here is what I am thinking for the bag:
For the main outside part, the red sock monkeys.
For the handles and top edge, the polka dots.
For the side panel, the "sock" fabric.
For the liner/inside pockets, the blue and off-white sock monkeys.
How do you think that will look?


The patterns in the book are overlapped so you have to trace them onto something else to use them. There were also some pattern pieces to make with simple measurements. I didn't have anything at home to do that with...


I did a little internet searching and found some pattern tracing paper options. So I drove out to our local Hancock Fabric store, but they did not have it. Or anything like it. The only tracing paper they had was 8 1/2 x 11. Boo.

I went next door to the A.C. Moore to see if they had something and happened upon a large pad of tracing paper in the art supplies. Its a little more than I wanted to spend, but it is 50 sheets of 19 x 24 paper. Its sturdy enough to re-use, so I think it will be a good investment. I could have ordered the stuff I found online, but I really need to get this show on the road before I go back to school this week. So, I got the pattern pieces all cut out and, man alive, there are a lot of them! I knew that this bag would be a harder project than I've done before, and I hope I haven't gotten in over my head!

Saturday, August 7, 2010

So close!!


Yesterday I finished quilting! I really was nearly finished the day of my last post - all except for the last little tiny section. I love how it turned out. I still know that my quilting needs practice, but its really not as bad as I thought it would be. All that's left is the binding and I need to pick a color for it. I would love some suggestions from you. I have been contemplating the pink from the birds - but would that be weird since only the bird fabric has pink in it? What about yellow? Or blue? See, I need help. Please let me know what you think.

Wednesday, August 4, 2010

Free-motion quilting


Well, I did it. I am free-motion quilting. I am half-way through my quilt and it is certainly not gorgeous, but its not horrific either. I do have some definite opinions on the process, though. Here is what I've figured out so far.
Some of the pictures are hard to see, but if you click on them, it will show it to you a little bigger...

1. It was recommended to use a setting on your machine always that leaves the needle in the "down" position when you take your foot off the pedal. Holy crap I wish my machine had that option! Because you are working with such a large object in such a small space, if the needle is not down when you stop, it is highly likely that the quilt will slip and you will restart slightly off from where you stopped, making a little notch in your quilting line. I tried to hold onto the quilt each time and manually place my needle down before I moved my hands, but I wasn't always able to do that, or sometimes I just forgot.


2. I don't think I could use this quilting technique on anything larger than this quilt. It is very difficult, in the middle especially, to move the quilt around smoothly because of all the extra that is all around. I have the right side rolled up like the tutorial suggested, but it is still very awkward. Making nicely curved lines and keeping the stitches even is all about how smoothly your hands move, but even if I had the fine motor skills of a god and years of practice, it would be hard to do that with that much extra quilt to the sides, top and/or bottom. Then again, lots of people do it, I reckon.
(Now that I added the picture, the rolled-up part doesn't look so big, but its awkward, trust me.)


3. Machine quilting is SO MUCH FASTER than hand quilting. That is a VERY big plus. The other quilts I've made and/or helped with have been hand-quilted, which is nice, but it takes for-eh-var. I can't imagine how much even faster this would be going if I'd decided to use a straight-line pattern with a walking foot. I think that is what Christine is going to do, so we can compare later.

4. I need more practice. I am glad I decided to go for it with this quilt, even though I was really nervous. Like I said previously, the quilt is not perfect, but not awful either. Chances are, as time passes, I won't even really be that bothered with the funky places. The quilt on my bed is so super wonky (yeah, we didn't measure anything.) and I don't even notice it.
side note: I looked for a picture that I am sure I took of that quilt and included in a blog post, but I couldn't find it. I really should add those neat labels to my posts for that kind of thing.

Here are some close-ups of the quilting. Its definitely not as smooth as I would like, but it will do.


I will update again when I finish the rest. Hopefully it will happen today!