Monday, December 9, 2013

Ruffin's Reversible Stocking Tutorial

Just after Ruffin was born I decided to make stockings for our family. I looked all over for a stocking pattern that I liked, but I couldn't find one. So I made one myself! I figured that if I had to make a lining for the stocking, why not make it reversible? So Ruffin's Reversible Stocking was born. I had so much fun making it that I wrote up a tutorial. And never posted it. Probably because I just haven't posted a whole lot since Ruffin was born, but more likely because I was too nervous to post it. Here are our stockings from then:


  Now that I have sweet Josephine, she needs a stocking too! What a perfect time to revisit the tutorial - and finally share it! I went through the tutorial myself to make Jo's stocking (just to check myself).  

It was raining outside when I made it (and still is) or I would have a better picture.


Drum roll, please.....

Ruffin's Reversible Stocking Tutorial


Materials needed:
Exterior fabric – ¾ yard
Liner fabric – ¾ yard
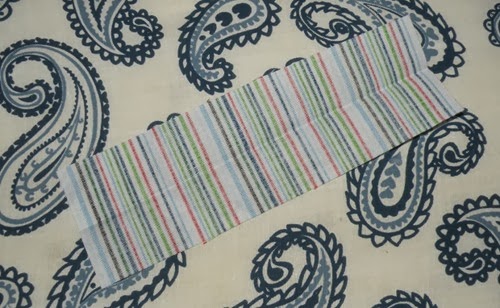
·      The exterior and liner fabrics will be interchangeable when you are finished (because its reversible!), but you will want to pick one to stand for each for the construction process. For (most of) this tutorial, the thicker, vertically stiped fabric is my exterior and the thiner, horizontally stipred fabric is my liner.
·      You may need more fabric if you have to match up a one-directional pattern.
·      I used quilting cotton, but other fabrics would work. If you use a thicker or heavier fabric, you may want to eliminate the fusible fleece interfacing.
Fusible Fleece – ¾ yard I used Pellon 987F
Coordinating thread
Disappearing fabric marker or fabric chalk

All seams are ¼ inch unless stated otherwise.

Print, tape together and cut out the stocking pattern piece, Make sure you print at 100% (no page scaling). Trace the stocking directly onto the fabric, then flip the pattern over and trace a mirror image onto the fabric. Cut 2 stocking pieces like this out of each fabric and fusible fleece. Make sure the right/fusible sides are mirror images of each other like this: 


Cut one (1) 6” long x 18” wide pieces out of each fabric and fusible fleece for the cuff. If you are using directional fabric, you will want to cut it to match wide ways.

Cut one (1) 6” long x 2” wide piece out of each fabric for the hanging loop. If you are using directional fabric, you will want to cut it to match long ways, like this:


Press the 2”x6” exterior piece in half, matching the wrong sides along the long edge. Open and fold the long edges in toward the center crease so that they meet in the middle and press. Fold in half and press again (like double-fold bias tape). Stitch along the open edge to form the hanging loop. Repeat this process for the 2”x6” lining piece.


Following the manufacturer’s instructions, fuse the fleece onto the wrong side of the 2 exterior stocking pieces and the 6”x18” exterior piece.

Match right sides of the exterior stocking together and pin. Stitch around the sides and bottom. Do the same for the lining stocking, but leave a 5 inch opening on the back side above the heel for turning, backstitching at both ends of the opening.

Cut notches in the heel and toe seam allowance, being careful not to clip the stitching:


Turn both stockings right-side out and press. Make sure to press the opening in the lining to match the seam.

Fold the exterior hanging loop in half and pin to the heel side seam of the exterior stocking, matching edges. The seam allowance of the stocking should be pressed to one side from previous step. Sew across edge with a zig-zag stitch and backstitch back across. Repeat with lining pieces.


Fold the exterior cuff piece in half with right sides together, matching short sides and stitch. Press seam open. Repeat for lining cuff.


With right sides together, slide the exterior cuff over the top edge of the exterior stocking. If you have a one-directional fabric, make sure the design on the cuff piece is right side up here (same direction as the stocking). Line up top edges and match the cuff seam with the heel side seam. Pin, making sure the hanging loop is lying flat in between the cuff and stocking, and sew. Turn entire piece wrong-side out and press the new seam flat. Repeat with lining.


Leave the lining wrong-side out and turn exterior right-side out. Slide the exterior stocking into the lining - right sides should be together. (You’re not crazy – this is a picture of a different stocking - the green is my liner, red is the exterior)


Match the cuff seams and line up top edges. Pin and sew all the way around.

 
Turn through the opening in the lining. Hand-sew the opening closed. Push the liner into the exterior stocking. Press around the top cuff edges before turning down. After turning down cuff, press stocking completely. Reverse when the urge arrives!


I hope that all made sense. Sorry some of the pictures were not all of the same stocking. I will have to re-do the pictures next time I make a stocking. Please let me know if you have any questions or something doesn't make sense!! Happy Stocking Making!

Sunday, September 15, 2013

Birthdays Galore!

My sweet Ruffin just turned 3 years old. I can't believe how quickly the time has flown by. He is so much fun and, even though we certainly have our share of three-year-old moments, these have been the best three years of my life. They have also been the busiest three years of my life. I never appreciated the copious amount free time I had before kids. Need proof? Just look at how many blog posts I wrote before September 2010 and how many I've written since. Don't get me wrong, I am not complaining (much) - my kids are totally worth it, but to all you people who don't have kids yet: get all your super awesome, fun, time-consuming stuff done now! That being said, I still do some pretty cool stuff, but now I do it with my kids.

So much birthday awesomeness!! Three cakes, a new bike, trip to Pop's house, family reunion and the  mountain state fair! 

 
Cake #1

 
Cake #2

  
Cake #3

Balance bike is so fun! He's already cruising with his feet up.

Giant turkey leg - Score!!

Once Ruffin turned 3, he was able to start preschool where he's met some new friends. One of his friends also just had a birthday and we were invited to her party. So we went shopping for a present for a 5-year old girl. I didn't really know the little girl at all, except that she went to preschool with Ruffin and my background info was this: the party was to be Power Puff Girl-themed and when I called the mom to RSVP she said that the little girl liked superheroes. My little Josephine is still in the baby toy range, so I had no idea how horrible the toy selection is for little girls (I will tell you this: Jo will never have a "Bratzilla" doll). I stayed away from the super girly stuff since we had superheroes on the brain. We left Target empty-handed (birthday present-wise - I don't think it is possible to leave Target empty-handed. We spent at least 40 bucks). Now what would we do? Make something, of course! So Ruffin & I set off for Joann's. We ended up with a cut of some pretty sweet Marvel comic fabric and (naturally) a coordinating fabric as well. I got home and put it in the wash while I made a prototype of what I had in mind: a travel pencil/paper wallet. 

I think this is the first time ever that the finished product was exactly right the first go 'round. I am glad for that since once I finished the Marvel version it seemed pretty masculine - even for a girl who likes superheroes. So here is what I ended up with (these photos looked way better on my phone...).


I was experimenting with where to put the "nancymoo" tag. I think I like it better inside - what do you think?

I took them both to the party and asked her mom which one the little girl would like better. Her mom picked the owls - Yay for the prototype being perfect! The superhero wallet will be for sale soon in my Etsy shop. 

(Next post topic: Yes, I have an Etsy shop)

Wednesday, August 14, 2013

Turning a tube and strawberry yum!


I've been sewing some a lot lately (more to come on that) and one of my projects has a long tube (like for a sash or strap) that I sew and have to turn right-side-out. I was planning to make several of these and was ready to give up on it (because it takes... so... long...) when I decided to ask the expert - Google. Lo and behold I saved my project and my patience with this quick tutorial on how to turn a tube. After I watching this and using this method I was amazed. Amazed at how easy it was and amazed at how I had never thought of that. So simple!!

In other news, its been raining. A lot. I posted earlier on a rainy day activity that I did with my son. One my other recent rainy day activities involved some strawberries from my fridge. Ruffin has been really into the classic Winnie-the-Pooh books lately and they refer in several stories to cakes with pink icing. So we made some. Once again I asked my friend, Google, for some recipes for strawberry cake using fresh strawberries. I ended up using this recipe for strawberry cupcakes - even though the author recommended using frozen berries. They were quite delicious! I used whole wheat flour (because that's what I had) and didn't use quite as much sugar in the batter since I had already cut up and sugared my berries.


I also ended up putting too much strawberry in my icing, which made it so yummy, but also runny.


It didn't affect how my my family liked them, though.


I wish I had some pics of Ruffin helping (which he did!) but it was just me at home, so he needed pretty close (sans camera) supervision. I'm sure you understand. :)

Sunday, July 21, 2013

Fun with toddlers


Ruffin and I have had quite a few rainy days in the past several weeks. Luckily, I have a Pinterest board just for such occasions. We tried this fun activity the other day and it was a hit!


I realized as I was typing this that I probably should've titled this post "fun with preschoolers" since my nearly-three-year-old son will be in preschool this fall. Holy goodness. Everyone said it, but I didn't believe them until it happened to me. They grow up so fast! 

What do you do on rainy days with your kids?

Thursday, July 18, 2013

I'm Back!

Hi, there bloggy land! I am sure that it seems I've gone to live in an underground bunker since I haven't been around in... wait, how long?!? Well, I won't tell if you won't.

So where have I been? I have been busy with... life! Life involving two (that's right, two!) sweet kids and a busy fun-filled teaching job. So here's the quickie update: Sweet Ruffin will be three in about 6 weeks and Sweet Josephine was born in January, so she is 6 months old. They are the best! 

Pretty much everything else is the same except for my presence here and at my sewing table! But that's been changing. My hubby and I are really settling into this two kid thing (so fun!) which means I can demand request more sewing time. I have been on Pinterest like a fool and checking out all my bloggy friends lately and realized how much I miss blogging and connecting with all of you out there. You are so inspiring and uplifting!

I plan to continue posting regularly with new projects and family fun. See you again soon!


Monday, February 27, 2012

Ruffin love

So I apparently, I am just not quite motivated enough to draw out that diagram and get it up on the blog for the twirly scarf... I'll do it soon, I promise!!

But until then, here is some (or a lot) Ruffin love from the past few weeks! :D


Our favorite Christmas present (the wagon, from Grandpop)!!
Hat crocheted by Mommy, of course!

Mr. Fix-it.


Taking advantage of our spring-like winter to check out a worm!


No, Mommy, I don't need a nap.


Helping Mommy cook....


...is so much fun!


And eating is too!

Ruffin is the best! Every time I think it can't get any better - it does! We are having a blast!

Thursday, January 26, 2012

Twirly Scarf Tutorial

As promised, here is how I made the fun, twirly scarf! I used worsted weight yarn (Vanna's Choice for the Christmas scarf and Wool-Ease for the one in this post) and a size J hook. Any yarn will do - the bulkier the yarn, though, the bulkier your scarf will be and the twirliness (pretty sure I just made that up) kind of bulks it up already, so be careful. A different yarn may also require a different hook size.

  • Chain (about) 200 (or however long you want your scarf to be). Turn and single crochet (sc) in 2nd chain from hook and in each remaining chain across. OR Foundation Single Crochet (about) 200 stitches (or however long you want your scarf to be). I used futuregirl's awesome tutorial when I was learning how.
  • Chain 2 and turn. Double crochet (dc) in first stitch. 2 dc in each remaining stitch across.
  • Chain 2 and turn. Dc in first stitch. 2 dc in each remaining stitch across. Fasten off and weave in ends.

I told you it was easy! There are some variations you could do for fun, like change colors on the rows for some cute stripes, or add a row of sc of a contrasting color. I made this one last night in about 2.5 hours. Have fun making yours!!

pic

Monday, January 16, 2012

Knitting....

I am SO excited. I took a knitting class on Saturday! I have taken one before, but I was a loser and didn't practice any because it was so much FASTER to crochet because I was already good at that (not practicing what I preach to my recorder students....). So needless to say, I forgot it all! The class was at an awesome LYS that I should go to more often, Friends and Fiberworks.

It was so fun!! One of my friends took the class with me and we started a cotton dishcloth. I am still too embarrassed of my shoddy beginning knitting to show it to you yet... maybe later. Our instructor taught us English-style knitting, which I found awkward as a crocheter, but I powered through. I downloaded the KnittingHelp app (SO good, btw) and used the video to try out Continental-style, which is supposed to be better for people who already crochet. The main difference (and if you knit and I am a wrong, please correct this noob) is in which hand you hold the yarn in. For crocheters, we hold the yarn in our left hand, which remains the same for Continental knitting. The English-style holds the yarn in the right hand, which is what make it feel so strange to me.

I found that my stitches from the class with the English-style knitting were much more even and my tension was more consistent than when I worked on the Continental-style at home. This really baffled me since that way felt so much more comfortable. I am going to keep trying out both ways, but I am leaning towards the thought that with the left-hand yarn I was working too fast and not paying enough attention (since it felt so much more comfortable) and I got careless. I am hoping that will remedy itself as I practice more.

I also had a few places where I messed up, either dropped a stitch, added a stitch or didn't follow through all the way to the right needle and didn't quite know how to fix it. I will have to study the knitting more as I practice in order to understand the stitch construction. I feel like it is more complex than the crochet stitch - that may not be true simply because I understand crochet so well (which is a great feeling and makes knitting that much more scary!).

I am so impressed by crochet badass, Alice, (at futuregirl) who recently starting knitting and she is amazing now! I do not think I will improve and expand my skills quite that quickly, but she is such an inspiration for me to continue practicing this time and not give up because it is more work right now than crocheting.

I'll keep you posted and maybe get up enough courage to show you my wonky dishcloth.

ps - I'm still working on those tutorials I promised you from the last post - I didn't forget!!

Sunday, January 8, 2012

Stuff I've made...

Well, Christmas was busy as expected, but I did get (most of) the presents done that I wanted to. I would like to tell you all about how I made these things, but I'll link to the tutorial I used instead. (*I just noticed as I was doing the pics that I don't have a tutorial for the crochet projects because I didn't use one. I'll make writing that up the goal for my next couple of posts!)

Sorry that the pictures aren't the best - I just haven't been great about photographing my projects lately, so getting even poor quality pictures is better than none at all! (*just noticed that I didn't edit/crop these pics - oops - maybe I'll go back and fix them later. or not.) I have several projects in the works and I have also found some really cute things on Pinterest that I want to make. I think I was really behind in joining, but I'm glad I did. If nothing else its good for inspiration! Here are some of the things I've made over the last few months.

Twirly scarf
These are so fun to make. I also made one in pink and blue
for my niece with a matching one for her American Girl doll.

Cute Post-it note holders.
Easy and fun!
Here is the tutorial I used.

Earbud (or coin) pockets.
So cute! I did a couple more of these that I didn't get
pics of - sushi print and fishy print.
Here is the tutorial I used.

Fingerless gloves/wrist warmers for my sister.
I made her a hat a scarf out of the same yarn last
year and I found another skein - score!


Crochet hook holder for my Secret Santa at school.
I also made a cute one for my sister in that
same gnome fabric from the earbud pouches.
Here is the tutorial I used.

Sunday, December 11, 2011

Creating for Christmas

So as much as I love giving handmade gifts, this year it has been really hard to find the time to make them! You get 1 guess as to why...

I have been making a few things, though. Remember my last post? Small projects are getting me through. I have crocheted some wrist warmers (SO quick and easy) and I have nearly finished a scarf. I'd post pics, but they're for (yet to be given) gifts. I made the gift for my secret santa at school (so neat - I'll post that after Friday when it is delivered). I have also sewn some lanyards (you know, those long necklaces to hang your name badge or keys on) at the request of some teachers at school. I made myself one and several people asked about them, so yay for (easy) commissions!

I have several quilting projects that I'd like to do/finish for myself (like my excellent t-shirt quilt) and for others (babies who are nearly a year old, slacker Aunt Nancy). I am hoping to get some time in on my few days off at home over Christmas break.

I may need to finish my quilt first, though, as the fireplace in the basement we watch TV and where I sew has decided it doesn't want to work. Its no fun to sew in the cold, I'll tell you what.

No new Ruffin pictures this time. He and I are both stuffy-headed snotty-faces right now. At least we're getting it out of the way before Christmas, right? :P Instead, how about a few more from the amazing photo session by Brittany at Inspired Life. They are from from the end of October, but still adorable! I'll put up some current ones soon!!