Tuesday, January 26, 2010

Project for me and present catch-up

First post of the new year! I know, its about time...

So, in my last post I told you about all of the presents I made for Christmas and one of them was this Margaret Bag for my friend, Amy (which I still need a picture of.... ). I liked it so much that I made one for myself! I am really pleased with how it turned out and its nice and BIG, which I love in a purse!


I think this picture mostly shows how wonky my pie safe is...


Pretty liner!


I also made this Lickety Split bag as an incredibly belated birthday present for my friend, Lina. Happy Super-Late-Birthday, Lina!!


And its reversible! Yay!


I have been kind of a bloggie slacker because I'm only showing you pictures of what I've finished instead of my in-progress action. I think the creative/thought/crafting process is the most fun part, especially when I'm pleased with the finished product. I'll try to do better!

Sunday, December 27, 2009

More presents!

So I haven't done a great job taking pictures so far. I made this diaper clutch for my sister-in-law and this awesome bag for one of my best friends, Amy. Maybe I can get them to take pictures for me... hint, hint. I do however, have pictures of the fairy dollhouse that I made for my niece and the fairies who inhabit it!


Here are the cutie fairies who will live in the house. I used the patterns in this book to make them. How sweet is that?


Here are my first attempt at sewing the sides together. If you click on the picture, you'll get a bigger image - at your own risk. I call these my frankenstein stitches. Ugly.


Here are the redone pretty stitches. Yay!

Tuesday, December 22, 2009

Christmas Time's A Coming

Here is the progress on the Christmas presents (that are safe to post). I'll keep taking pictures so that as people receive their gifts, you'll be able to see what I've been working on!

This is the Emmaline Apron from Meg at Sew Liberated. What amazing patterns!! This was more difficult than I had originally thought, probably my most ambitious sewing project to date. I wish I had better pictures, but I am really proud of how it turned out. It was for my Secret Santa at school, who loves to cook!

Its reversible! Please ignore my husband's pajamas in the corner.... And yes, those are chickens on the red side (you can see a bigger image if you click on the picture). Too cute! I got my fabrics from Asheville Cotton. They have the such an awesome selection. I wish my photography skills were better. Anyone know some good tips?


Here is my Secret Santa in her new apron! Yay!


Dollhouse and fairies coming tomorrow!

Sunday, December 13, 2009

Busy (Messy) Bee


I have been a busy (and messy - my husband is so understanding...) bee since my last post! I found the link to this fabric dollhouse tutorial on Carmen's blog and I knew I had to make one for my niece for Christmas and I have been working ever since. I am having so much fun that I want to start another one and I'm not even finished with this one! What I really love about it is that I get to design and be creative. I've had a few snags, but I think that now that I've made one, it will definitely be easier the next time. Here are a few of the obstacles I've encountered:

When sewing the side panels onto the main part, it was difficult to keep them aligned in the correct position. I pinned it, but it kept slipping, I think because of the batting-wrapped insert. The seam-ripper was my best friend (or worst enemy...?) that afternoon. It took me three tries to get it lined up all pretty like this:


When I finally got it lined up, it was so thick - especially the second time when there were two panels sandwiched in - that even with my zipper foot, it was hard to sew around it. The stitches are not pretty, but at least you can't see them!!

Another thing I wasn't sure about was attaching the designs to the house. I think in the future it may be better to actually sew the felt onto the fabric before sewing it all together. So far I have been using fabric glue to apply the decor to the house. It works fine for the felt to fabric bonding, but it is not holding the felt to felt very well. I'll have to keep experimenting with that... Here is a little preview - some of this has not actually been attached yet, its just propped up.


I am really happy with the fireplace. I need to figure out how to put a chimney on the outside. Yay!

My next step (after I finish the house) is to make the fairies that will live in the house. I am using ideas from this book. Stay tuned for the next installment...

P.S. - I haven't fixed my fused plastic bag yet... It turns out that my iron is not keeping an even temperature, which is likely the problem, so I'll update when I get a new one...

Sunday, November 29, 2009

I'm still here!!

Hello blog world! I am still here! Since school started its been crazy and I have not been very (or at all) inspired to make anything - or as Carmen at seaschell said "lost my crafty mojo." I absolutely love teaching, but it is draining. I don't have much left in me when I get home! My scant crafting has been my husband's Halloween costume. It was fun to make and I got it done in plenty of time, but it didn't inspire anything else. He was very proud, however.


This weekend I started a birthday present for one of my friends. Her birthday is today, so of course I've been procrastinating. She and I learned how to fuse plastic together this summer so I thought something made from that would be a fun present. I started a tote bag with a fabric top and handles with a cute felt flower applique. I didn't have a pattern or anything, I was just making it up. I was so happy and inspired to start making this and it was going really well. I got the bag sewed and the fabric top put on and the applique cut out and then... I burned it. Yep. That's right. I burned it. I wanted to make sure it was super sturdy and I over did it with the iron. When fusing plastic, over heating it doesn't turn it black, it melts it too much and leaves holes. Boo! Now I need to regroup and hopefully I can salvage it. I'll update you...


This is the bad so far. It was going to be really cute....


Here are the yucky holes I made. :(

Monday, August 17, 2009

Heirloom Crochet


These past two weeks have been kind of crazy for two reasons. One: I've made several small thing in rush mode because I needed to get them to people so I didn't even get pictures (some coffee cup sleeves and some tiny ami's for a sweet, sweet baby). Two: I've been spending some time with my family and my in-laws this past week.

Normally when we go on the big summer trip down there I get a ton of crocheting done, but this time we were flat out BUSY! We didn't get to do one big get-together with everyone, so Andy and I went all over to see his brother here and my sister there. I am glad we got to see everyone, but kind of bummed that I didn't get my relaxing craft time.

The last day we were there, my mother-in-law called me into the living room and said she had something for me. Andy's parents are in the process of moving in with his grandmother to help take care of her, so they've been giving out a lot of stuff, but to their children. So I was a little baffled when she wanted to give me something. I was even more so when she pulled out this bag. Andy and his siblings get cool old books and furniture and I get... the trash? Well, actually I was afraid it was a bag of baby clothes for a not-so-subtle hint that we needed to get the show on the road. Luckily it was neither. What is inside the bag is priceless.


It is a crochet project that Andy's (other) grandmother was working on before she died. It is tiny and beautiful and I am honored that they wanted to give it to me. Granted, no one else in the family crochets, but I still feel special. There are at least a hundred of the squares done and a ton of the yarn to do more. I didn't find any directions, but after looking at it for a few minutes, I think I've got it figured out - all except for the center of the square. I have so. many. crochet books that surely it is in one of them. No one was sure what she was making - bedspread, tablecloth, couch cover - so I'm excited that I get to decide! I have never worked on something so fine before, I'll probably have to go buy those teeny tiny hooks because I don't think I have any. Now that school is starting up (this week!! ack!!) I don't know how quickly I'll work, but I'll keep updates going. What an awesome challenge for me!


Look how tiny those stitches are!!

I have to add the fact that I LOVE the macro function on my camera. I mean seriously - click on that picture - you can see the freaking pixels of the fake-o wood on the crappy desk!! Wow!

Thursday, July 30, 2009

Hero of Craftrule


I was complimented on the t-shirt I was wearing the other day by a Geek Squad agent. If you have read my previous posts, you know my husband is a part-time agent, so being complimented by one of them could be alright, but this was one of the real geeks. The shirt I was wearing said "Hero of Hyrule" on it which, for those of you not into the Nintendo scene, references the kingdom in the video game "The Legend of Zelda." I bought this shirt when I finally beat the "Ocarina of Time" on our N64 a *few* years ago. (I think Andy - I mean "we" - have upgraded three times since then...) It was the first video game I've ever beaten and (for a very not-hardcore gamer like myself) it was hard! I enjoyed the game very much and was proud of myself. I reckon I probably deserve to be complimented by a real geek since wearing the shirt probably makes me pretty geeky myself.
So by now you are probably wondering where I am going with this, since this is supposed to be my craft blog. Today I again feel proud like the Hero of Hyrule - or Craftrule, which is my new kingdom in the office/dining room where I have my station semi-permanently set up on the table. I knocked another item off my list before lunch today. I love having days off. I could really get used to this!
As promised here are some details of the recently completed projects!

Starling Handbag


I posted on the completion of the crochet part of this bag here. Since then, I sewed the liner and added some embellishments to the outside. Overall I am quite pleased with it! It was very fun to make and I can't wait to make more. Watch out - it is probably what everyone is getting for Christmas this year. I wonder if a brown one is manly enough for my dad.... kidding.


The embellishments were a new thing for me. It was the first time I've really tried embroidery and I think it turned out alright. I ended up going around the flower petals because I accidentally ripped off one of the petals on the left flower at the bottom. Can you find it? I felt more secure about the flowers once I did that and I kind of like the way it looks. My embroidery skills are a little clumsy, but I figure the more I do it, the better I'll get! I used these awesome tutorials to make the flowers, bag and liner.

Tooth Fairy Bag


I made this for my 5-year old niece who just lost her first tooth. I wish I had found this cute pattern before she'd lost that one, but I can't wait to show it to her! The tooth on the front is actually a tiny pocket to put the tooth in and the tooth fairy leaves the goods in the bag. Purple is her favorite color - and mine too! :D

Lanyards


I've been wanting to make Andy something for a while, and I am mostly a crocheter, which, let's be honest, isn't super manly. Now that I've taken up more sewing, I have a lot more options for him! Here is where the lanyard idea came from: After an incident of my keys falling off my lanyard while hiking way up on the Blue Ridge Parkway and the following ordeal which involved no cell phone signal, my wallet in my locked truck and hitchhiking - and I'm just scratching the surface there - I decided to chunk that lanyard and get a new one. Then I decided not to buy one, but to make one. No problem, right? Well, actually it was no problem! I made one for myself and one for Andy. Yay crafts for Andy!


Other Crafts!
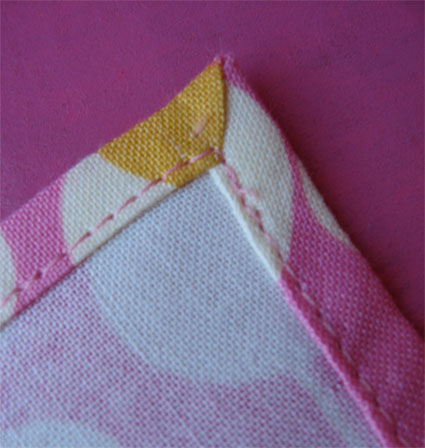
I also make a set of napkins for my sister. This was my first time trying mitered corners. I am such a novice sewer and its all been self-taught, which works for a lot of things. I feel like I would benefit from some tutoring, but these napkins ended up being alright. The corners were fine, but I am not quite there with pressing my seams evenly enough yet. I don't know if that is something I'm doing altogether wrong, or something that will just get better with more practice.


Lastly, I made a wallet out of the fused plastic that I made on a crafting play date a few weeks ago. It was my first time sewing on plastic and my first time using my zig-zag stitch on my machine - which is way cool!


This is the Summer of New Crafts in Craftrule!